
Content Security Policy reporting is a very 'spiky' business. One small misconfiguration or a sudden traffic surge can generate an enormous amount of traffic with no prior warning. Because of this I over provision on the hardware for https://report-uri.com to soak up small spikes but I also need to scale quickly for large ones.
DigitalOcean
All of our servers are run on DigitalOcean. They've been rock solid since I started using them a few years ago and their service is simple, affordable and low hassle. If you want to try them out then please use my referral link (https://m.do.co/c/6a2e0aeeb5bd) and not only will you get $10 in free credit, you can help support my services too! If you want to see just how 'spiky' CSP reporting can be I wrote an article about a CSP 'DDoS' I got hit with a while ago. I went from normal traffic to several Gb/s in a matter of minutes in Just how much traffic can you generate using CSP? and just a couple of weeks ago I published Report URI: A week in numbers.
Which Droplet to use
A droplet is just DigitalOcean's name for a VPS and they come in a variety of sizes.
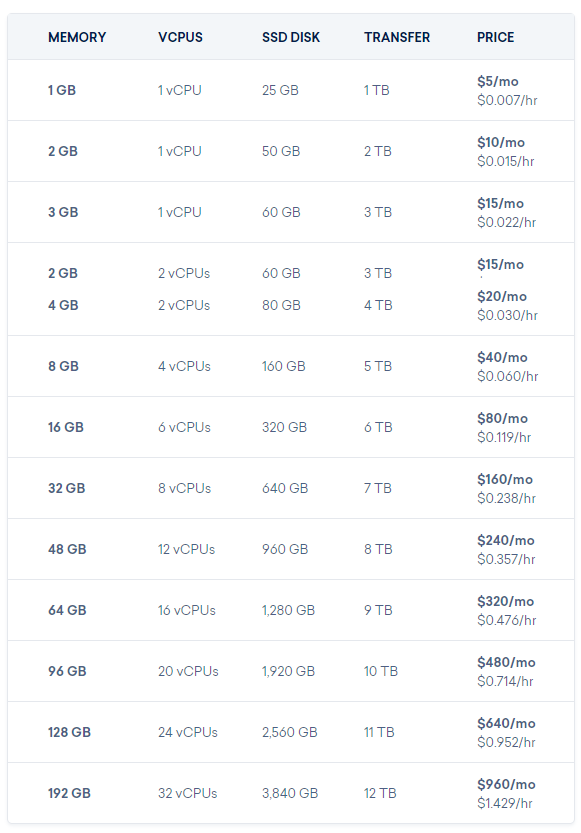
Because the resource I utilise the most is CPU, the best option for me to use was the $5/mo server that gives me a single CPU core. After that it'd be $10 or even $20 per core per month as you move up through the bigger options. This might seem like more work or maintenance as it results in a larger number of servers, but everything and anything you have to do with them should be automated anyway so the actual number of servers I have doesn't mean anything.
Auto deploying new droplets
DigitalOcean provide droplet metadata which is a method for servers to access information about themselves. This is really handy when spinning up new servers to get details like the IP address that will change across deployments of a given image. It's as simple as this to get the IPv4 address of the new server:
curl -s http://169.254.169.254/metadata/v1/interfaces/public/0/ipv4/address
There's also droplet user data that provides the ability to pass in a bash script, amongst other things, that will be run when the new droplet is created. Using these 2 features I have created a single API call that can be used to bring online a new server from our base image, update everything, deploy the latest code from GitHub and add itself to the appropriate DNS pool for deployment into production! Below are the sections of the bash script that I pass in when I create a new droplet.
Update the server and get the latest code
When the new server spins up, the first thing that needs doing is an update as the image could be out of date. Following that I grab the latest source code from GitHub as I don't want to have to wait for the auto update that happens with cron as we could be in production before that happens.
#!/bin/bash
set -e
# Update the server.
apt-get update && apt-get -y upgrade
# Get the latest source now.
git -C /var/www/html/report-uri pull
A simple and effective method to ensure everything is up to date before we proceed.
Setup New Relic monitoring
I use New Relic monitoring across my servers and to ensure that each server reports correctly I need to modify the appropriate config files. I grab the hostname and the IPv4 address for later use.
#Get the Hostname and IP of the server
HOSTNAME=$(curl -s http ://169.254.169.254/metadata/v1/hostname)
#Update nginx-nr-agent config
echo "name=$HOSTNAME" >> /etc/nginx-nr-agent/nginx-nr-agent.ini
echo "url=http://127.0.0.1/nginx_status" >> /etc/nginx-nr-agent/nginx-nr-agent.ini
#Update the newrelic PHP application name
echo "newrelic.appname = \"$HOSTNAME\"" >> /etc/php5/fpm/conf.d/20-newrelic.ini
These files have already been cleared of previous values in the base image as it makes it far simpler at deploy time to just append the new lines of config.
Restart all services to reload new configs
Now that updates are complete and configs have been updated, I restart all of the services to ensure everything is properly loaded.
#Restart all services
service php5-fpm restart
service nginx restart
service nginx-nr-agent restart
service newrelic-sysmond restart
Add DNS records
Lastly, for the server to start receiving requests it needs to add the appropriate DNS entries for traffic to be routed to it. The below call to the CloudFlare API is just one of those that may be made depending on the purpose of the server I'm bringing online, but demonstrates how easy it is to do.
PUBLIC_IPV4=$(curl -s http://169.254.169.254/metadata/v1/interfaces/public/0/ipv4/address)
#Add new DNS record to CloudFlare
curl -X POST "https://api.cloudflare.com/client/v4/zones/[zone id]/dns_records" \
-H "X-Auth-Email: [email address]" \
-H "X-Auth-Key: [auth key]" \
-H "Content-Type: application/json" \
--data "{\"type\":\"A\",\"name\":\"report-uri.com\",\"content\":\"$PUBLIC_IPV4\",\"ttl\":120,\"proxiable\":true,\"proxied\":false}"
Adding the DNS record is done last so I can be sure that the server is ready to receive traffic. The bash script also has the set -e flag present so that if any of the steps fail it will abort the rest of the script and not add the DNS entries if something didn't work.
Using this with the DigitalOcean API
Now that we have the entire startup script as I call it, we need to pass this in to DigitalOcean and spin up a new droplet using it. I have an image sat waiting on DigitalOcean (here's one I made earlier!) that I use as the base for servers used on Report URI to save some time coming online. I could install NginX, PHP, memcached and everything else I need, along with pulling down all the appropriate configs, from a clean image of Ubuntu, and I may well do that one day, but for the sake of simplicity I have an image with these things already done. update: I now do this with Ansible! Managing servers with Ansible
Get the image ID
To get the information of images you have stored in DigitalOcean, you can use this API call (docs):
curl -X GET -H "Content-Type: application/json" -H "Authorization: Bearer [token]" "https://api.digitalocean.com/v2/images?page=1&per_page=10&private=true"
This will return a list of your own custom images and not the publicly available images. The response will look like this:
{"images":[
    {"id":17756489,"name":"reporturi-master-12042018","distribution":"Ubuntu","slug":null,"public":false,"regions":["sfo1"],"created_at":"2018-04-12T21:45:25Z","min_disk_size":20,"type":"snapshot","size_gigabytes":7.06}],

"links":{
    "pages":{"last":"https://api.digitalocean.com/v2/images?page=2&per_page=10&private=true",
    "next":"https://api.digitalocean.com/v2/images?page=2&per_page=10&private=true"}},

"meta":{"total":16}}
I've trimmed the response for sanity here as I have 16 images and listing them all would be messy! The only thing that I need here is the ID of the image I want to use which you can see is 17756489.
Create a new droplet
Now we have the ID of the image we want to use, you can pass that to the call to create a new droplet and it will spin up a new instance of that image (docs):
curl -X POST -H "Content-Type: application/json" -H "Authorization: Bearer [token]" -d '{"name":"reporturi-master-12042016-01", "region":"sfo1", "size":"512mb", "image":17756489, "ssh_keys":null, "backups":false, "ipv6":false, "user_data":"[userData]", "private_networking":null}' "https://api.digitalocean.com/v2/droplets"
All of the parameters are pretty straightforward and for your user data script you need to escape double quotes with " and replace newlines with \n. With that, you're ready to deploy new instances with this single command! It will spin up a copy of the image, update it, deploy your latest code and add it to DNS, all taken care of.
Triggering the script
When and how you trigger the script will be your last hurdle and really depends on your situation. I have an alert setup with my New Relic monitoring that sends an email which triggers a new instance to be added. I'm still working on the finer details of that but it looks quite promising in testing.
You may want to use a similar approach and I have a blog on Monitoring Server and Application Health with New Relic if you want to set that up. Even without automatic triggering though, this is a really simple way of deploying new instances and can literally be done with a single script run! The whole process takes just 3-4 minutes from start to end and the new server will be handling requests as soon as the DNS changes propagate.