
PageSpeed is an open-source webserver module that is designed specifically to improve the performance of your site without having to make any changes to your content or workflow. By implementing a whole host of best practises, I saw a notable improvement in page load time by simply running the default config. In this blog I'm going to look at setting up the PageSpeed module for NginX and the various configurations it supports.

Building NginX with PageSpeed
To get PageSpeed support, we will have to build NginX from source. Fortunately, this isn't too difficult.
Get the latest version of NginX
Grab the URL for the latest version of NginX and then substitue it for the version in the following commands.
cd ~
wget http://nginx.org/download/nginx-1.7.4.tar.gz
tar -xzvf nginx-1.7.4.tar.gz
Grab the latest version of PageSpeed
Likewise, get the latest version of PageSpeed.
cd ~
wget https://github.com/pagespeed/ngx_pagespeed/archive/v1.8.31.4-beta.tar.gz
tar -xzvf v1.8.31.4-beta.tar.gz
cd ngx_pagespeed-1.8.31.4-beta/
wget https://dl.google.com/dl/page-speed/psol/1.8.31.4.tar.gz
tar -xzvf 1.8.31.4.tar.gz
Get your NginX configuration arguments
When building NginX from source, there are a lot of different items you can configure. Things like whether or not to include certain modules, features to enable or disable, installation and configuration paths etc... Everyone could have a different setup so you will have to make sure you get yours right if you're upgrading NginX to match the existing installation. If this is a clean install, it doesn't matter quite so much. You can run the following command to see details of your existing installation.
nginx -V (note the uppercase V)
That will give you similar output to the following.
nginx version: nginx/1.6.0
built by gcc 4.6.3 (Ubuntu/Linaro 4.6.3-1ubuntu5)
TLS SNI support enabled
configure arguments: --prefix=/usr/share/nginx --conf-path=/etc/nginx/nginx.conf --http-log-path=/var/log/nginx/access.log --error-log-path=/var/log/nginx/error.log --lock-path=/var/lock/nginx.lock --pid-path=/run/nginx.pid --http-client-body-temp-path=/var/lib/nginx/body --http-fastcgi-temp-path=/var/lib/nginx/fastcgi --http-proxy-temp-path=/var/lib/nginx/proxy --http-scgi-temp-path=/var/lib/nginx/scgi --http-uwsgi-temp-path=/var/lib/nginx/uwsgi --with-debug --with-pcre-jit --with-ipv6 --with-http\_ssl\_module --with-http\_stub\_status\_module --with-http\_realip\_module --with-http\_auth\_request\_module --with-http\_addition\_module --with-http\_dav\_module --with-http\_geoip\_module --with-http\_gzip\_static\_module --with-http\_image\_filter\_module --with-http\_spdy\_module --with-http\_sub\_module --with-http\_xslt\_module --with-mail --with-mail\_ssl\_module
Take a copy your configure arguments, from the first --, as this is what you will need. If there are items at the end that contain path information referring to your existing version of NginX, omit them.
Building NginX
Now you have your configuration arguments, you're ready to build the new version of NginX.
cd ~/nginx-1.7.4
The next command is one long command and there is a single addition to the items you copied in the step above. The very first configuration argument is what we need to add the PageSpeed module we downloaded. Substitute my path for the path where you downloaded and extracted the PageSpeed module.
./configure --add-module=/home/scott/ngx_pagespeed-1.8.31.4-beta --prefix=/usr/share/nginx --conf-path=/etc/nginx/nginx.conf --http-log-path=/var/log/nginx/access.log --error-log-path=/var/log/nginx/error.log --lock-path=/var/lock/nginx.lock --pid-path=/run/nginx.pid --http-client-body-temp-path=/var/lib/nginx/body --http-fastcgi-temp-path=/var/lib/nginx/fastcgi --http-proxy-temp-path=/var/lib/nginx/proxy --http-scgi-temp-path=/var/lib/nginx/scgi --http-uwsgi-temp-path=/var/lib/nginx/uwsgi --with-debug --with-pcre-jit --with-ipv6 --with-http_ssl_module --with-http_stub_status_module --with-http_realip_module --with-http_auth_request_module --with-http_addition_module --with-http_dav_module --with-http_geoip_module --with-http_gzip_static_module --with-http_image_filter_module --with-http_spdy_module --with-http_sub_module --with-http_xslt_module --with-mail --with-mail_ssl_module
The command will output a lot of information but the important bit is the summary at the end.
Configuration summary
+ using system PCRE library
+ using system OpenSSL library
+ md5: using OpenSSL library
+ sha1: using OpenSSL library
+ using system zlib library
nginx path prefix: "/usr/share/nginx"
nginx binary file: "/usr/sbin/nginx"
nginx configuration prefix: "/etc/nginx"
nginx configuration file: "/etc/nginx/nginx.conf"
nginx pid file: "/run/nginx.pid"
nginx error log file: "/var/log/nginx/error.log"
nginx http access log file: "/var/log/nginx/access.log"
nginx http client request body temporary files: "/var/lib/nginx/body"
nginx http proxy temporary files: "/var/lib/nginx/proxy"
nginx http fastcgi temporary files: "/var/lib/nginx/fastcgi"
nginx http uwsgi temporary files: "/var/lib/nginx/uwsgi"
nginx http scgi temporary files: "/var/lib/nginx/scgi"
If there are any errors in the configuration summary, it's most likely due to missing dependencies on your system. If this is the case it will tell you the items that are missing and you can use any of the appropriate commands below to install the items you need on Ubuntu.
sudo apt-get install build-essential zlib1g-dev libpcre3 libpcre3-dev
sudo apt-get install libgeoip-dev
sudo apt-get install libgd2-xpm libgd2-xpm-dev
sudo apt-get install libxslt-dev
sudo apt-get install libssl-dev
Once that's done, or if you didn't need to update any packages, use the following 2 commands to finish your setup and installation of NginX.
make
sudo make install
Assuming everything goes without error you can now restart NginX and check that you have the latest version running.
sudo service nginx restart
nginx -v (note the lowercase v)
This should give the following output, appropriate to the version you installed.
nginx version: nginx/1.7.4
What if I still see the old version?
Don't panic! If everything updated just fine, skip over this section. If not, you're in the same boat I was. I used a pre-built image from DigitalOcean for my Droplet (VPS) and I can only think there was a slight difference in config there. If you restart NginX and still see the old version, it means the commands above probably put the new executable file in the wrong location. Fortunately, it's an easy fix.
cd /etc/init.d/
cat nginx
This will give you a lot of output but all we're looking for is the location of where the NginX executable is. At the start of the file you will see something along the lines of DAEMON=/usr/sbin/nginx. Copy the path /usr/sbin/nginx. Now we need to navigate back to the folder where we downloaded NginX and rebuild it with the new information.
cd ~/nginx-1.7.4
This time on the configuration arguments you need to add --sbin-path=/usr/sbin/nginx to the end. Obviously change the path to the one you copied in the step above and update your PageSpeed module path too.
./configure --add-module=/home/scott/ngx_pagespeed-1.8.31.4-beta --prefix=/usr/share/nginx --conf-path=/etc/nginx/nginx.conf --http-log-path=/var/log/nginx/access.log --error-log-path=/var/log/nginx/error.log --lock-path=/var/lock/nginx.lock --pid-path=/run/nginx.pid --http-client-body-temp-path=/var/lib/nginx/body --http-fastcgi-temp-path=/var/lib/nginx/fastcgi --http-proxy-temp-path=/var/lib/nginx/proxy --http-scgi-temp-path=/var/lib/nginx/scgi --http-uwsgi-temp-path=/var/lib/nginx/uwsgi --with-debug --with-pcre-jit --with-ipv6 --with-http_ssl_module --with-http_stub_status_module --with-http_realip_module --with-http_auth_request_module --with-http_addition_module --with-http_dav_module --with-http_geoip_module --with-http_gzip_static_module --with-http_image_filter_module --with-http_spdy_module --with-http_sub_module --with-http_xslt_module --with-mail --with-mail_ssl_module --sbin-path=/usr/sbin/nginx
Then the same as before.
make
sudo make install
sudo service nginx restart
nginx -v (note the lowercase v)
You should now see:
nginx version: nginx/1.7.4
Enabling PageSpeed
Enabling PageSpeed is really easy. You can do it in your NginX config or in your virtual host file. I chose to do it in my NginX config, so the following lines need to be added in the http block. If you want to do it in your virtual host files you need to add them in the server block.
pagespeed on;
pagespeed FileCachePath /home/nginx/ngx_pagespeed_cache;
You can put the FileCachePath anywhere you like, just make sure that you create the folder and make sure the NginX process can read/write to it.
sudo mkdir -p /home/nginx/ngx_pagespeed_cache/
sudo chown -R www-data:www-data /home/nginx/
That's it! Just reload your NginX configuration and PageSpeed will now be running with the default settings.
sudo service nginx reload
Configuring PageSpeed
PageSpeed is almost infinitely customisable, but to get you going, there are 3 basic modes. PassThrough, CoreFilters and OptimizeForBandwidth. PassThrough basically disables PageSpeed, a quick and easy method if you encounter issues. CoreFilters is the default and most people shouldn't have a problem with this. Lastly, OptimizeForBandwidth. This setting is a safer bet if you encounter issues with CoreFilters. To enable PassThrough or OptimizeForBandwidth, paste one of these lines in your config where you enabled PageSpeed earlier.
pagespeed RewriteLevel PassThrough;
pagespeed RewriteLevel OptimizeForBandwidth;
There are 62 different optimisation filters available in PageSpeed at the time of writing, and in CoreFilters mode, only 31 of these are active. In OptimizeForBandwidth mode, this number drops to 15. To see the whole list of filters that are available have a look here and scroll down to the table. You can see which filters are enabled in each mode and what other filters are available. If you want to enable other filters and test them, simply enable them using the following code.
pagespeed EnableFilters outline_css,outline_javascript;
pagespeed EnableFilters move_css_above_scripts,move_css_to_head;
You can use multiple lines to enable a number of filters if you don't want one huge line of config. I'm using every filter except rewrite_domains and add_instrumentation without any issues so far. Here is my config:
pagespeed on;
pagespeed FileCachePath /home/nginx/ngx_pagespeed_cache;
pagespeed EnableFilters combine_head,outline_css,outline_javascript,move_css_above_scripts,move_css_to_head;
pagespeed EnableFilters rewrite_style_attributes,prioritize_critical_css,make_google_analytics_async;
pagespeed EnableFilters include_js_source_maps,canonicalize_javascript_libraries,inline_google_font_css;
pagespeed EnableFilters local_storage_cache,convert_to_webp_lossless,insert_image_dimensions;
pagespeed EnableFilters inline_preview_images,resize_mobile_images,remove_comments,collapse_whitespace;
pagespeed EnableFilters elide_attributes,extend_cache_pdfs,sprite_images,trim_urls,pedantic,remove_quotes;
pagespeed EnableFilters defer_javascript,dedup_inlined_images,lazyload_images,insert_dns_prefetch;
pagespeed EnableFilters in_place_optimize_for_browser;
The best approach is to use to the default CoreFilters and then enable other filters as you see fit one by one, testing each as you go. If you don't hit any issues, you should see a notable improvement in the responsiveness of your site. Let me know how you get on in the comments below.
Testing PageSpeed
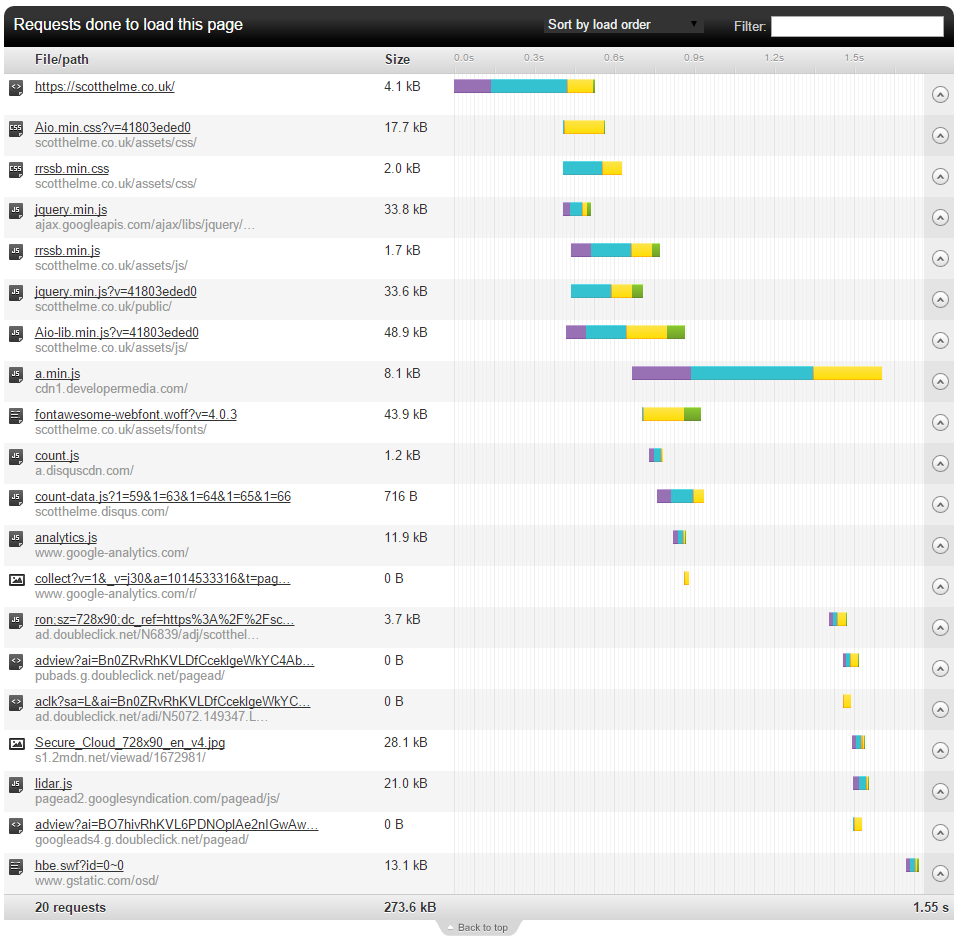
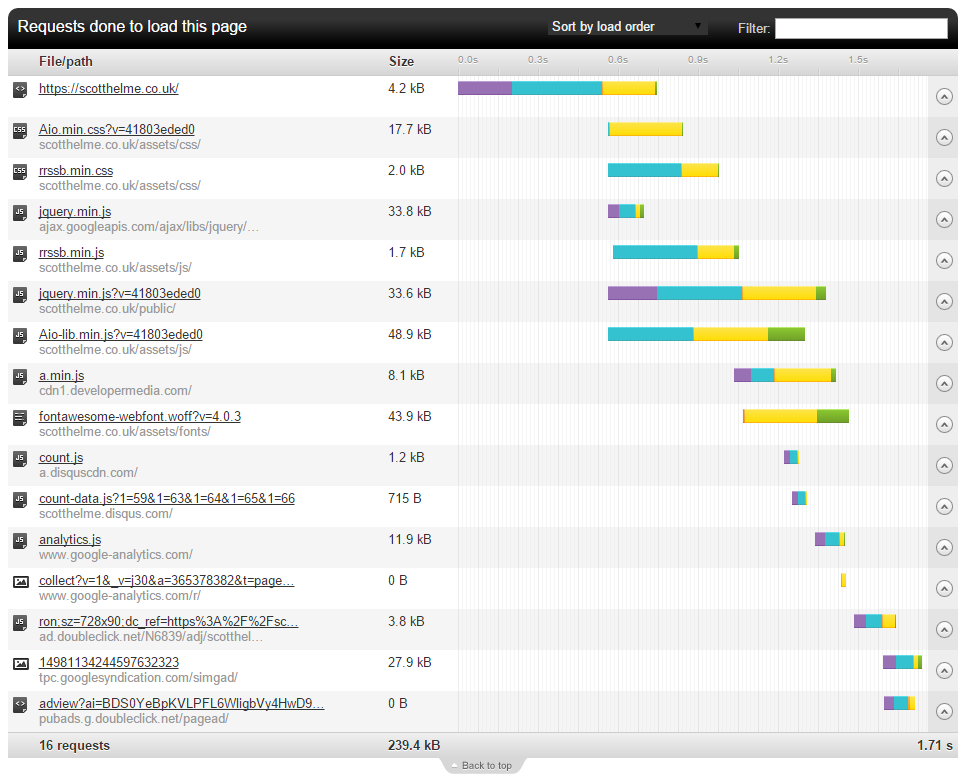
The only real way to prove that PageSpeed is any good is to have some metrics recorded from before PageSpeed was implemented and after it was implemented. The first and most obvious thing for me was that the page loaded noticeably faster. It was already pretty quick before, but after I turned PageSpeed on, I could tell there was an improvement. Google Chrome could even back me up on this. Here are the page load times as Chrome saw them, first without PageSpeed, then with PageSpeed.
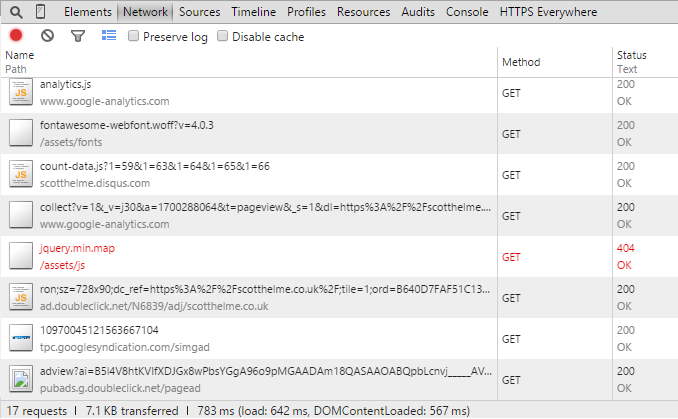
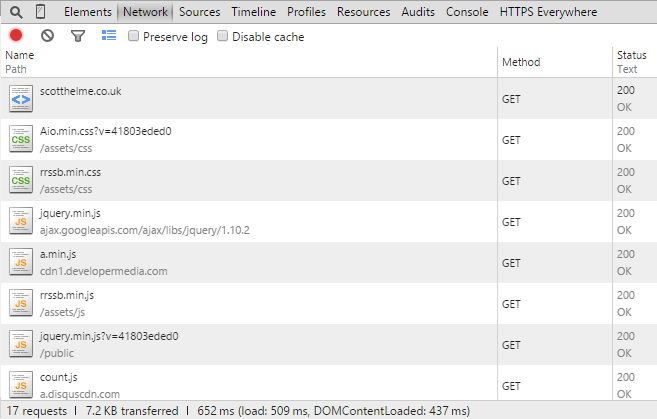
There's always a slight variance in these kinds of metrics, due to factors outside of our control, but, the page load time with PageSpeed enabled was consistenly lower by some margin. The examples above show a reduction from a 642ms load time to a 509ms load time, over 20% shaved off! To get some 3rd party data I also performed some tests using GTmetrix and Pingdom. Here are the GTmetrix scores, again without PageSpeed first then with PageSpeed.
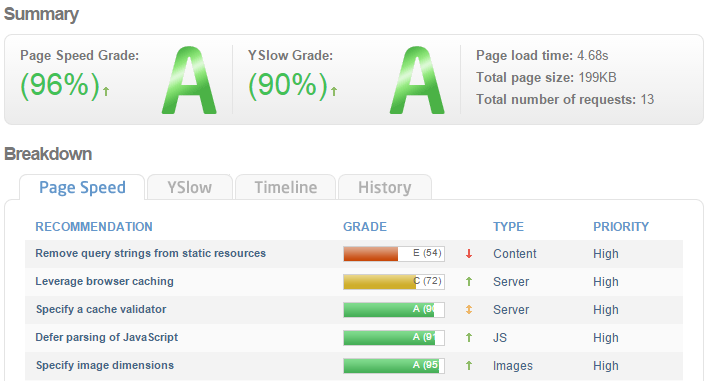
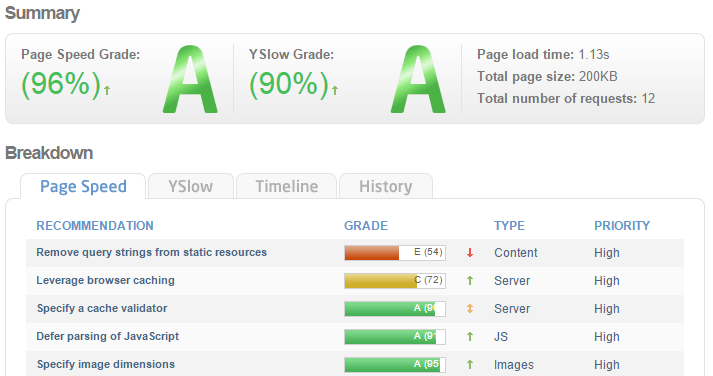
GTMetrix was showing a considerably higher page load time than I was seeing locally in Chrome, but they were running the test from a different location, a different country infact, than me. Still, there was a very impressive drop in page load time after I had enabled PageSpeed. Lastly, the Pingdom results.
These are interesting because I couldn't really get a baseline value out of Pingdom, I seemed to get some quite varying results. The results with PageSpeed enabled show a smaller page with fewer requests made, but a larger load time. Overall, there are signs of improvement but do take these kinds of results as a guide and not definitive answers. As you can see, there can be some degree of discrepancy between them, but overall they all indicate better performance.
Read More: Make your website faster with SPDY