
It's been a while since I've had time to work on my car and then to find time to write up what it is that I've been up to, but, it's time for another post!
The Series
The last post was awesome for me, getting into super technical and important details of the car by installing a Flex Fuel conversion kit. This allows my car to run on ethanol based fuels like E85, or, run any custom blend of ethanol in my fuel without having to change the map running on the ECU. This post is back on to cosmetic work and something a little special for the interior.
BMW Starlight
For those that aren't as enthusiastic about cars as I am, I think it's still probably safe to assume that Rolls-Royce has a pretty good name and is recognised as an impressive brand. I've only ever sat in a Rolls-Royce on a handful of occasions, but it was never a dissapointing experience! One feature that really did stand out though was the Starlight Headlining. A vast array of twinkling lights designed to represent the night sky.
The Wraith’s Starlight headliner is made of 1,340 fibre optics that can be hand-sewn into any constellation. #Bespoke pic.twitter.com/OpAX8iook0
— Rolls-Royce Motor Cars (@rollsroycecars) February 20, 2015
I really liked the look of it and decided to see just how realistic a prospect it was to retrofit this into my car. With some quick googling I found that there are companies out there that will do the retrofit for you and with some further searching found that the hardware required to do it was not only quite common, but it was quite cheap too. As a £10,000 ($14,000) option on the Rolls-Royce, I was hoping my Starlight upgrade would come in a little cheaper!
The Hardware
Whilst the hardware required to do this is cheap and readily available, but there is definitely one thing to watch out for if you plan to attempt this. The "Fibre Optic Lighting Kit" required comes in many shapes and forms, they're readily available on eBay, Amazon and just about everywhere else I looked, but look closely at the light source. The first fibre optic light kit I bought from Amazon had an LED that provided the twinkling effect by flickering the LED light, which resulted in all of the 'stars' twinkling at the same time, an effect that was just terrible. You can see here in this screenshot from the Amazon product video it's just an LED bulb in the housing:
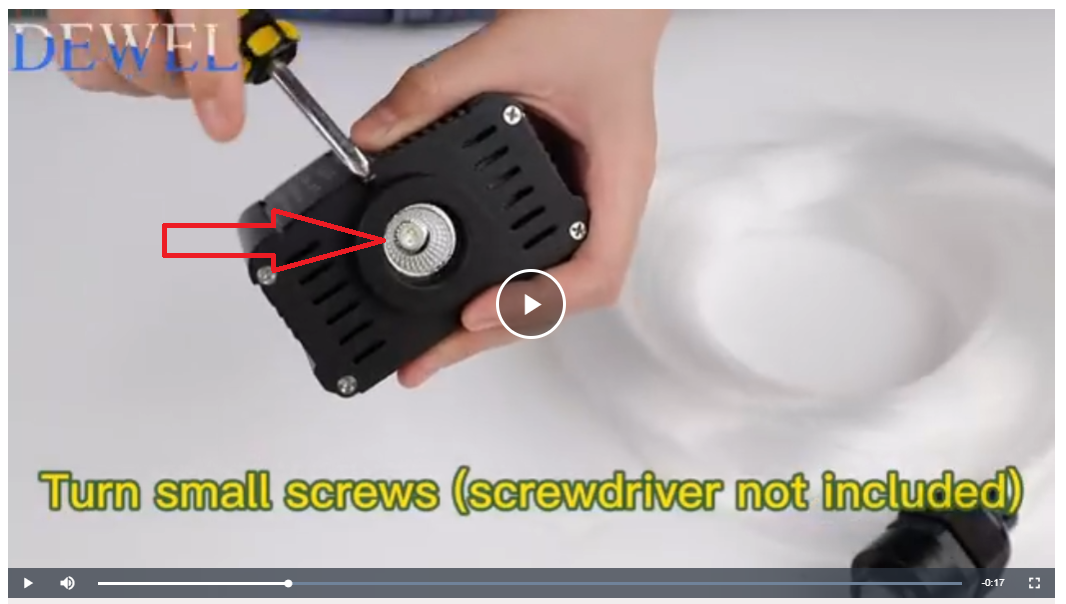
Instead what you want is a lighting unit with a motorised disc in front of the LED that has various holes and as it rotates, it blocks out and illuminates the fibres at different times. You can see the disc here on this Amazon product page:
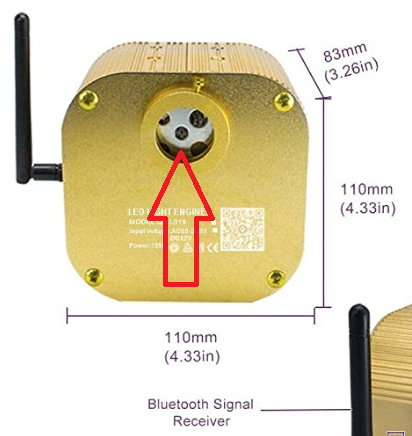
This gives a far better effect and I'd honestly say that the first type of light unit above aren't even worth considering. The price difference isn't bad and the unit with the motor that gives the proper effect cost £140 (~$170 USD). You can see here a quick clip of the motorised plate:
Here’s a video of the “LED Light Engine” that resides in the boot (trunk). pic.twitter.com/nfOlnGeRVs
— Scott Helme (@Scott_Helme) January 9, 2022
Other than the fibre optic light kit, surprisingly, you won't need any tools at all to get started, maybe some trim tools and then a glue gun, which I already had and only cost £12!
Removing the headliner
Nothing about this job was particularly difficult at all, and to my absolute surprise, removing the entire headliner from the car in one piece turned out to be really easy! The whole thing is just held in place by clips, which I guess makes sense because it's a lightweight piece of card with some fabric on it and its not structural, so I guess it doesn't need much to hold it in. I have a video that describes the process but I'll also summarise it here:
- Remove the clips holding in the grab handles by popping off the covers and then squeezing the rear of the clip to release it (may be useful to have a small screwdriver). These handles are also known as 'Jesus Handles' and 'Oh Shit Handles' depending on where you live.
- Remove the sun visors by popping off the covers and again releasing the clips holding them in.
- Remove the light/button units. These are held in with small retaining lugs that spring out behind the headliner. Start on any side of the unit and gently work your fingers under the edge and pull it down, the lug will squeeze back into the unit and then pop out from under the headliner. The unit will then come out easily, disconnect any wiring.
- The headliner will be tucked behind the A, B and C pillar trims. There is enough movement/flex to lift it out from behind the A and B pillar trim without removing them. You're going to have to remove at least one C pillar trim anyway so I removed both of them. They have 2 trim retaining clips, just gently pull on the trim and it pops off.
I spent yesterday doing another mod to my car that I’ve been wanting to do a while! After seeing a feature in a Rolls Royce, I wanted it in my car! The first step was getting the roof liner out ✨⭐️🌟💫 pic.twitter.com/Z2JrxCBb1J
— Scott Helme (@Scott_Helme) January 9, 2022
The headliner then slides out of the boot opening easily but I would absolutely have two people for this step to ensure you don't bend or fold the headliner whilst lifting it out. It's really flimsy and one person trying to carry it alone might end up accidentally folding or creasing it quite easily.
Installing the stars
The light unit I bought came with 375 'stars', so that meant that the next step was to decide where the stars were going to go on my headliner. I took a black Sharpie marker and started to randomly place dots all over the headliner whilst counting them. I also invited my wife and son to come in and randomly place batches of dots too, just to ensure they were really random! You can get quite close to the edge of the headliner and once all of the dots are placed, you need to punch a small hole through each of them with a needle. I grabbed the largest sewing needle I could find and punched all of the holes through.
Headliner on my living room floor! We took it in turns to randomly place 375 individual dots with a Sharpie and then punch a hole through from the back with a large sewing needle. pic.twitter.com/9fQgInoU8e
— Scott Helme (@Scott_Helme) January 9, 2022
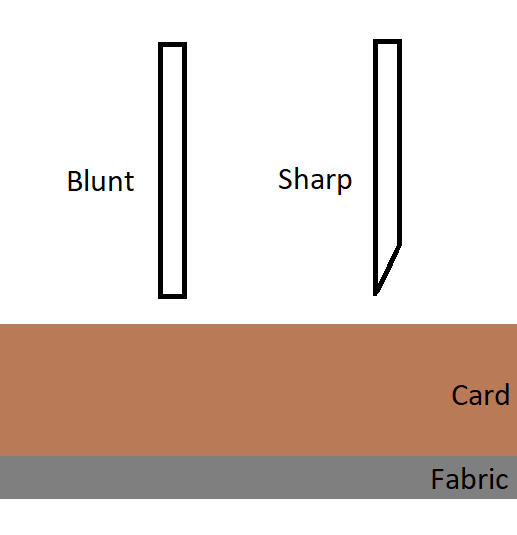
With that, you're ready to start installing the fibres in the holes you've just made. I wanted to give myself as much spare fibre length as possible to route and hide the light unit, so I laid the unit in what is the rear-right corner of the headliner as installed in the car and laid out the fibres across the top of the headliner. With just enough length for the fibres to reach the front of the headliner with a little slack, I taped the bundle the rear-right corner to hold it in place. Now it was time to start poking the fibres through the headliner and here's another tip I wish I'd known at the start and not figured out as I went! Get yourself a pair of flush cutters (because you're going to need them later anyway), and use them to trim the end of the fibre at a 45° angle. This drawing, whilst basic, demonstrates the point. Imagine the 'blunt' end of the fibre trying to poke through the fabric on the headliner and then imagine the 'sharp' end. It's much easier to push through the sharp end and it avoids what happened to me which is it snagging on the fabric and causing little bits of thread to pull out. Whilst the needle will have punched a hole through the card, there's no hole in the fabric for the fibre to pass through.
Once you've poked the fibres through, you want to take up most of the slack. The fibres towards the rear are going to have a lot of slack and the fibres at the front won't have much at all, but pull through whatever there is so it's still loose, you don't want it tight, but just have no spare slack laying around. Once ready, each fibre will need a small blob of hot glue to hold it to the headliner and prevent it pushing through or pulling back out once it's installed.
Next was the fibre optic lights. A mixture of 375 small, medium and large fibres. Each of them pushed through holes at random and then hot-glued in place after all the slack was pushed through. pic.twitter.com/CbwGuEre7m
— Scott Helme (@Scott_Helme) January 9, 2022
Once they're all glued in place from behind, you can stand the headliner up and use the flush cutters to snip off the slack hanging down that you pushed through. The flush cutters have the cutting edge on one side and the idea is that you can lay the cutter flat against the surface and cut 'flush', hence the name, so you will have no fibre protruding from the headliner and won't risk damaging the headliner by cutting it by mistake.
Once the glue had set I used a pair of flush cutters to snip the fibres flush to the headliner. Here’s ~50% of them cut! pic.twitter.com/jp8nE6JOcA
— Scott Helme (@Scott_Helme) January 9, 2022
When that's done and you're happy they're all flush, the headliner is ready to go back in the car!
I’m super impressed how good it looked at this stage! Bit of a risk, but I thought if it turns out terrible I can just leave them turned off 😅 pic.twitter.com/LtSuany1Qj
— Scott Helme (@Scott_Helme) January 9, 2022
I now get to mutter those famous words: "Installation is the reverse of removal!"
On a serious note though, it really is. You need to carefully slide the headliner back into the car without snagging the fibres, refit the handles, sun visors and light units along with any cables they had connected to them and that's it.
Installing the light unit
I wanted my light unit to go in the rear-right side of the boot because that's where the cigarette lighter socket was that I was going to take power from. By removing the trim in that corner, you'll find a nice little space where some existing electronics modules are already located. They each have a cut-out in the insulating foam and with a little trimming, I made a new space for the light unit to be installed.
With a small piece of the polystyrene trimmed out, the light unit dropped down into the compartment and gave me loads of room. It’s now a totally stealth install 😎 pic.twitter.com/LT7ydTojZo
— Scott Helme (@Scott_Helme) June 11, 2022
To get easier access to that corner, pull the rubber seal off the boot opening and unclip the trim panel. I then routed the spare fibre cable, of which I had plenty, down from the headliner behind the C-pillar and straight into the storage space I'd just made. The install is 100% clean and nothing is visible once the panels are all replaced. I used a cigarette lighter socket splitter because I already have something running off that socket, but they're super cheap to get and other than that, nothing else was required for this install.
Enjoy!
I do have to say I was really impressed with how this turned out. I was concerned that it just wouldn't look good and if that happened, I could always leave them turned off and nobody would known, but wow.
It’s in and working, and I think it turned out awesome! Of course my car still isn’t a Rolls Royce, but it makes the interior a much nicer place to be and it’s a pretty cool feature that people will notice 😎 pic.twitter.com/k3PPR4oOjz
— Scott Helme (@Scott_Helme) January 9, 2022
The light unit I bought is full RGB and while the kids loving playing with the remote and having some fun, most of the time I just have it on white with a slow twinkle. They're also pretty darn bright and can fully illuminate the interior, so it's often turned down quite a long way too, especially at night. The remote control is simple and works anywhere in the car without issue, even from some distance outside, so you can customise it however you'd like, and, the unit remembers the setting so each time you start the car, it will be as you left it.
The light projector is RGBW so we could go full disco mode, but for me it’s just a white twinkle. To get a true ‘twinkle’ there is a motor that spins a disc with random holes in it in front of the LED projector. Here’s the remote that came with it. pic.twitter.com/IZMOJsJs6m
— Scott Helme (@Scott_Helme) January 9, 2022
It's not going to make the car go any faster, that's for sure, but as I've said in previous posts, the cabin is where you spend all of your time and making that a nicer place to be is always a good thing. Everyone that's seen this in person has been amazed by it and it's probably quite a unique feature, especially amongst BMWs.
Parts
Here's the list of parts used in Part 17 and where you can get them:
View all of the other blog posts here: The BMW M140i Project Series