
I've previously tackled a problem on my local network where devices would be naughty and try to sneak around by using their own DNS server and not the one assigned by DHCP. After a recent hardware change at home I had to find a new way to tackle the same problem.
The UniFi Security Gateway
In the first iteration of rebuilding my home network that took place back in 2016, I splashed out on a lot of Ubiquiti UniFi hardware and built My Ubiquiti Home Network.
Boy is my wife going to be mad at @troyhunt when she gets home... 😂 pic.twitter.com/Xe465BQatn
— Scott Helme (@Scott_Helme) November 28, 2016
The setup included a UniFi Security Gateway, some AP AC Pro access points and some US-8-150W PoE gigabit switches and a CloudKey to manage it all and it was awesome. To take things to the next level I setup a Pi-hole, a little Raspberry Pi running a DNS server that blocks a heap of bad stuff at DNS and I blogged about that in Securing DNS across all of my devices with Pi-Hole + DNS-over-HTTPS + 1.1.1.1. The problem was, there were some devices on my network that decided to ignore the DNS server assigned in DHCP and punch straight out of my network and use their own, external DNS server. Naughty naughty. That's where Catching and dealing with naughty devices on my home network came in and I used the USG to catch these DNS requests trying to punch out of my network and redirect them internally back at the Pi-hole for filtering. It worked a treat and all was well until I upgraded my hardware again.
My Ubiquiti Home Network - V2
After I wrote quite a few blogs about my experiences and upgrades to my Ubiquiti Home Network, Ubiquiti reached out and asked if I wanted to try their new kit, the UniFi Dream Machine Pro! Of course I was onboard with this idea so they sent over a UDM Pro for me and I purchased several other things I needed wanted to upgrade at the same time. My Ubiquiti Home Network - V2 was born.
The @ubnt fairy came and I couldn’t be more excited! 😝 pic.twitter.com/KkJ8gElheX
— Scott Helme (@Scott_Helme) April 16, 2020
Everything about this upgrade was great and totally worth it but the UDM Pro is different to the older USG so my method for catching and dealing with those naughty devices was lost. Over time I've tried and tested different approaches to achieving the same thing and now I'm finally at a point where I'm ready to share and have something reliable out there!
iptables to the rescue!
iptables is basically the Linux Firewall and we're going to configure it to help us out with our naughty devices and DNS problems. Right now, if I do a DNS lookup and specify an external DNS server, the DNS request can pass out of my network and on its merry way to the specified DNS server. Here am I am querying the Google 8.8.8.8 DNS service:

Nothing shows up in my Pi-hole because nothing went to my Pi-hole, the request punched straight out of my network and ignored the DHCP assigned DNS server:
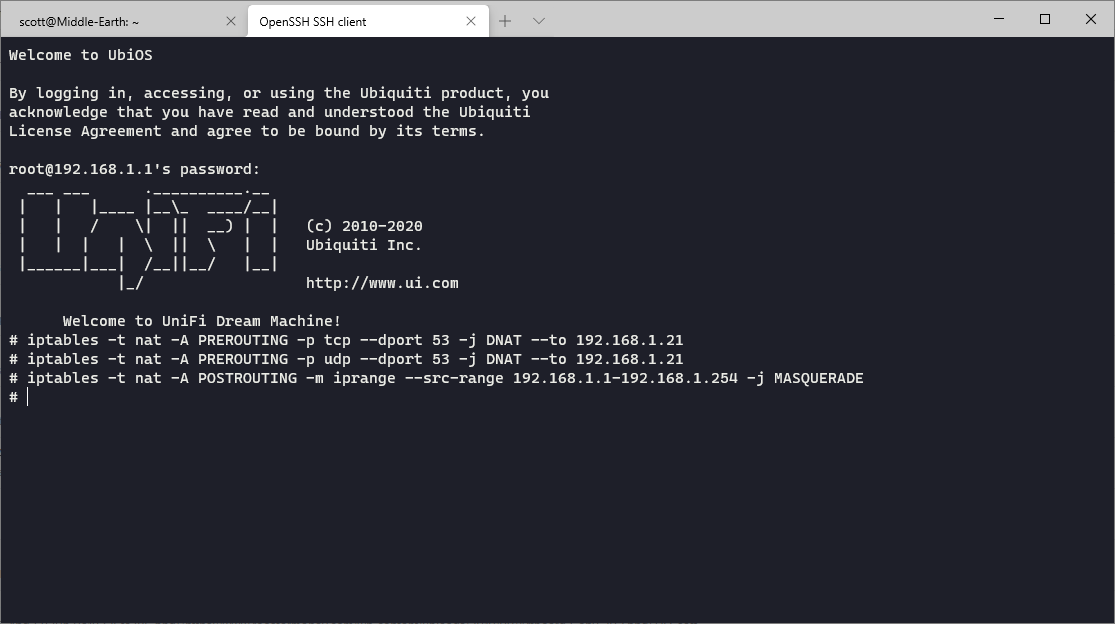
Now I'm going to SSH into my UDM Pro and add some new firewall rules to see if we can try and deal with the problem.
To configure iptables we use the iptables command and specify the changes we want to make. The first command I'm going to run is this one:
iptables -t nat -A PREROUTING -p tcp --dport 53 -j DNAT --to 192.168.1.21
Let's break that down:
iptables - We're using the iptables command to modify rules.
-t nat - We're making changes to the nat table.
-A - We're (A)ppending a new rule.
PREROUTING - We want our changes applied before anything happens with traffic matching this rule.
-p tcp - The (p)rotocol to match is tcp.
--dport 53 - The destination port to match is 53.
-j - What to do if the packet matches the filter.
DNAT - Change the destination of the packet and stop processing other rules.
--to 192.168.1.21 - Where we want the packet redirecting to.
Similarly I'm going to also run the following command to catch UDP DNS traffic:
iptables -t nat -A PREROUTING -p udp --dport 53 -j DNAT --to 192.168.1.21
Some devices on the network won't be happy with the above changes so to keep them happy we need to run one final command:
iptables -t nat -A POSTROUTING -m iprange --src-range 192.168.1.1-192.168.1.254 -j MASQUERADE
This tells the UDM Pro to transparently answer those DNS requests itself but whilst it still looks the client is communicating with the external DNS server. You can see this in action now if I run that same DNS lookup from before.
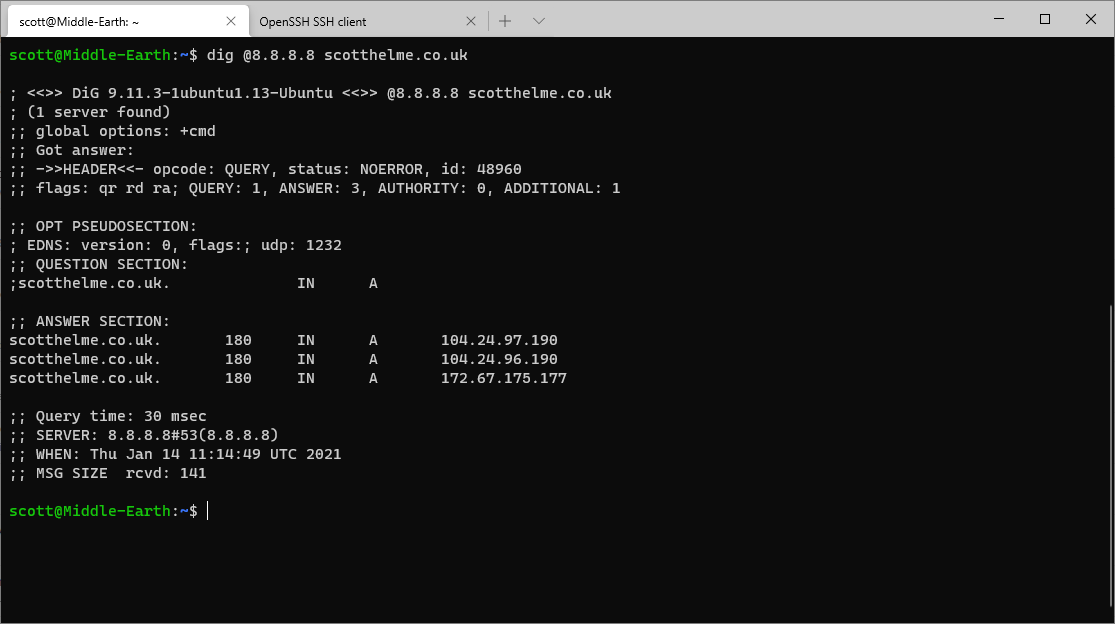
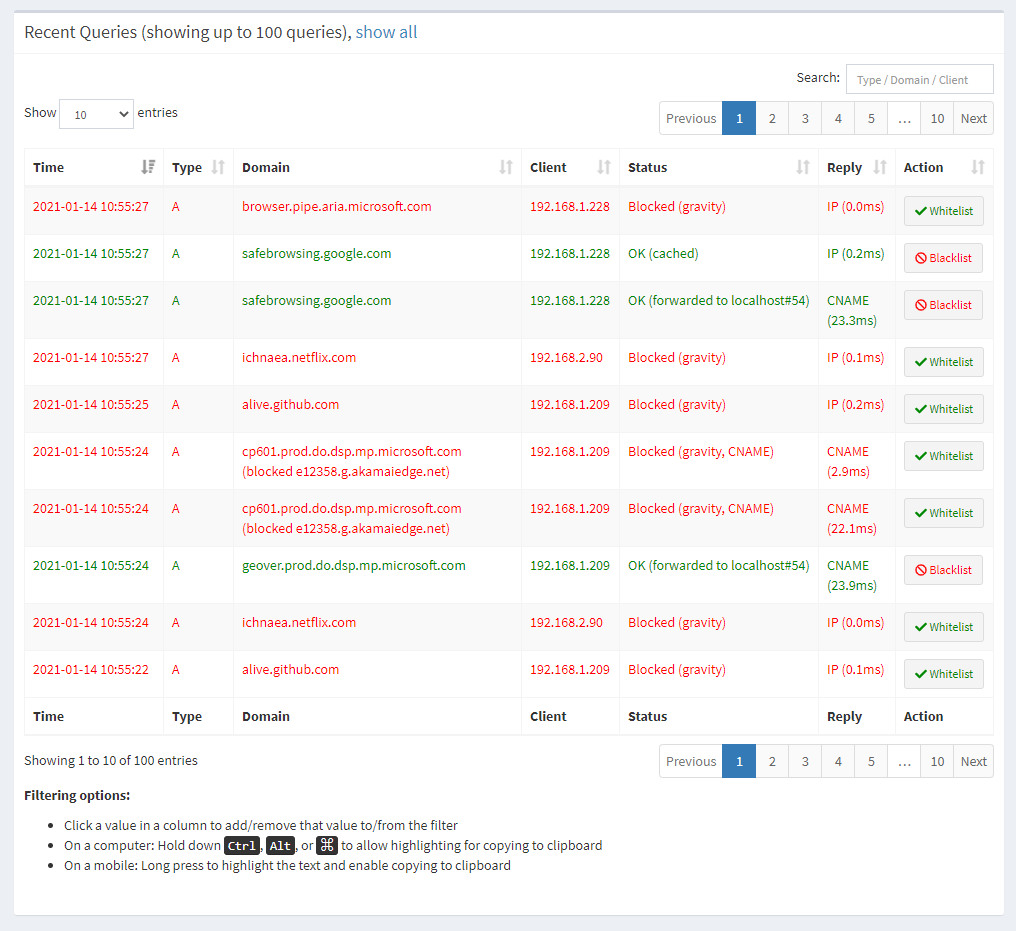
The commands were run and applied on the UDM Pro and then I ran exactly the same dig (DNS lookup) command again against the 8.8.8.8 DNS server. You can see down at the bottom that dig thinks it got a response from 8.8.8.8, but in reality it didn't. Let's take a look at the Pi-hole interface.
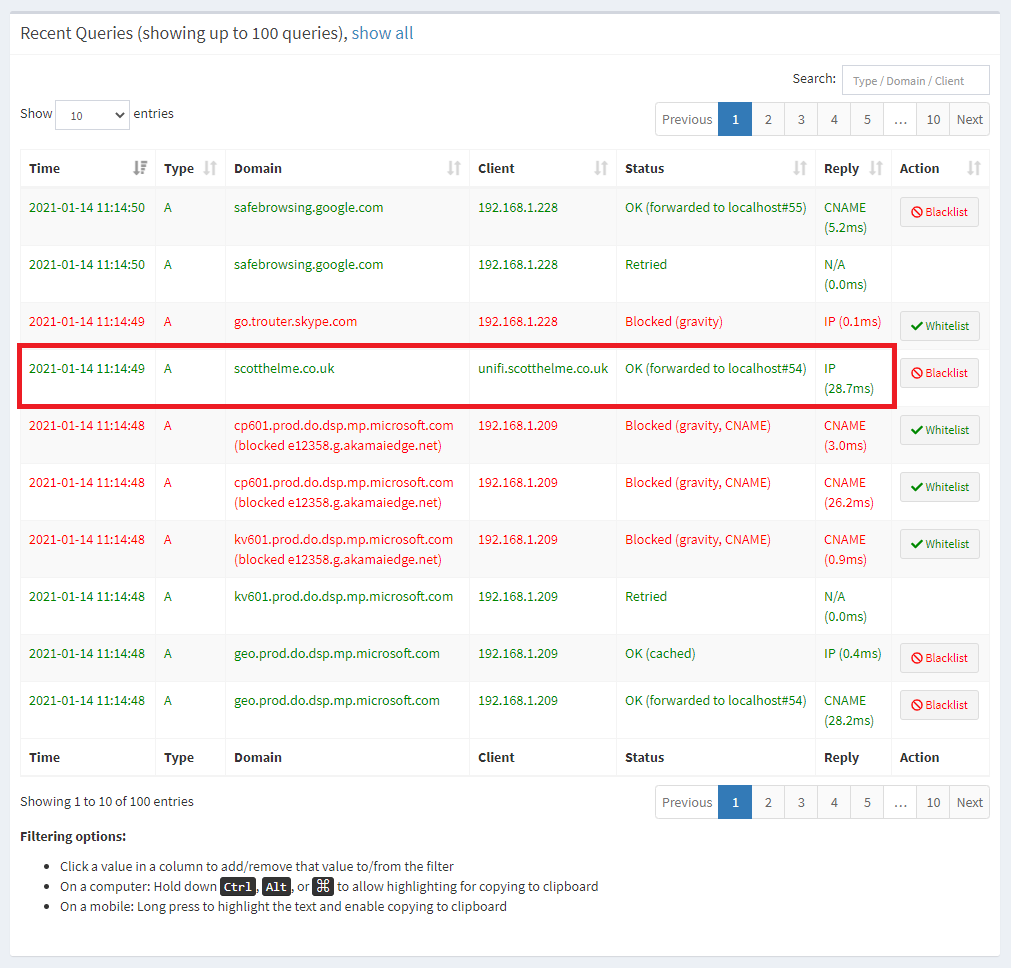
Here we can see a DNS request being made for scotthelme.co.uk that originated from unifi.scotthelme.co.uk which is the hostname for my UDM Pro on my internal network. This request did not originate from the IP or hostname of the server making the DNS request because the server was trying to punch out of my network but got caught by the UDM Pro and redirected internally. It thinks it spoke to 8.8.8.8 but it didn't and that's because the DNS protocol has no security and the server can't tell its traffic was modified or tampered with! The only thing you will need to do with the rules above is change the IP addresses to correct IP addresses for your Pi-hole/DNS server but there is possibly another step too.
Using these rules on your own UDM Pro
The rules above are not a universal solution for everyone and may need some slight changes to work in your circumstances. You need to understand what the rules above do and what you want them to do in order to change them to suit your needs. First of all, if you make a breaking change and want to undo it then all you need to do is run the exact same command again with a single change.
iptables -t nat -D PREROUTING -p tcp --dport 53 -j DNAT --to 192.168.1.21
iptables -t nat -D PREROUTING -p udp --dport 53 -j DNAT --to 192.168.1.21
iptables -t nat -D POSTROUTING -m iprange --src-range 192.168.1.1-192.168.1.254 -j MASQUERADE
The change from -A (A)ppend to -D (D)elete will remove the rule that matches exactly and return things to how they were before you ran the command to add the rule. Now that's covered, let's look at what changes you might need.
Do not block your Pi-hole from using DNS
If you look back at my earlier linked post about setting up my own Pi-hole, my Pi-hole does not use DNS to communicate upstream to resolve queries, it uses DoH (DNS-over-HTTPS) instead. This is great because it means my ISP and anyone else on the upstream network can't spy on my traffic and I'd highly recommend you set that up too. However, if your Pi-hole is using DNS to communicate upstream then the above rules will block all outbound DNS traffic, including your own Pi-hole, so nothing will work. You'd need to make an exception for your Pi-hole to be allowed to do external DNS in that case.
iptables -t nat -A PREROUTING ! -s 192.168.1.21 -p tcp --dport 53 -j DNAT --to 192.168.1.21
iptables -t nat -A PREROUTING ! -s 192.168.1.21 -p udp --dport 53 -j DNAT --to 192.168.1.21
iptables -t nat -A POSTROUTING -m iprange --src-range 192.168.1.1-192.168.1.254 -j MASQUERADE
In the modified rules above I've added ! -s 192.168.1.21 to the command which stops the rules being applied if the request originated from my Pi-hole IP address of 192.168.1.21. If my Pi-hole needs to do DNS externally then of course this makes sense and all you need to do, as before, is update the IP address to that of your own Pi-hole. This will let your Pi-hole do external DNS but will stop any other devices on your network being able to do external DNS. Nice!
Persisting these changes on the UDM Pro
If you want these changes to persist through firmware updates and device reboots then there's another step to complete. For that, I'm going to be using udm-utilities which is quite easy to setup. SSH into your UDM Pro and run the following commands:
unifi-os shell
curl -L https://raw.githubusercontent.com/boostchicken/udm-utilities/master/on-boot-script/packages/udm-boot_1.0.2_all.deb -o udm-boot_1.0.2_all.deb
dpkg -i udm-boot_1.0.2_all.deb
exit
This will allow you to now create a script that will run on every boot and even persist through firmware updates. Change to the correct directory to store the script and open a new script file for editing.
cd /mnt/data/on_boot.d
vi 10-iptables.sh
Paste in the content of the script by pressing i to enter edit mode and add your own commands used above:
#!/bin/sh
iptables -t nat -A PREROUTING -p tcp --dport 53 -j DNAT --to 192.168.1.21
iptables -t nat -A PREROUTING -p udp --dport 53 -j DNAT --to 192.168.1.21
iptables -t nat -A POSTROUTING -m iprange --src-range 192.168.1.1-192.168.1.254 -j MASQUERADE
Then save and quit by hitting Esc, :wq and then Enter. Finally, make the script executable and check everything went OK.
chmod +x 10-iptables.sh
ls -la
Your output should look something like this and 10-iptables.sh will be green:
# ls -la
total 12
drwxr-xr-x    2 root     root          4096 Jan 14 11:38 .
drwxr-xr-x   12 root     root          4096 Jan 14 11:34 ..
-rwxr-xr-x    1 root     root           252 Jan 14 11:38 10-iptables.sh
That's it! Those firewall rules will now be setup each time the UDM Pro boots so they aren't lost, even through a firmware update.